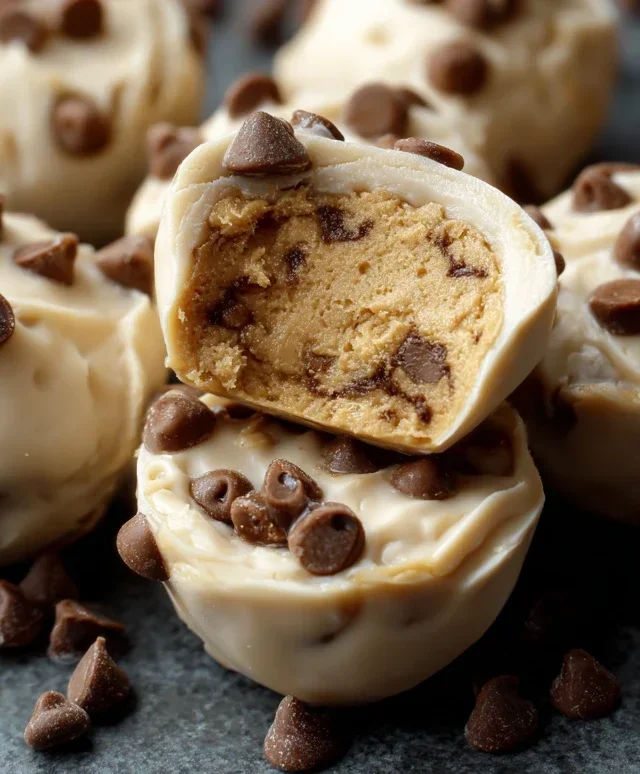
Frozen Greek Yogurt Peanut Butter Bites – Easy Treat
Frozen Greek Yogurt Peanut Butter Bites are about to become your freezer’s new best friend, and I’m so excited to share this recipe with you! If you’re anything like me, you’re constantly on the hunt for that perfect, guilt-free treat that satisfies your sweet tooth and keeps you feeling good. Well, look no further! These delightful little bites are the answer to your snacking prayers. They’re incredibly easy to make, requiring just a handful of ingredients that you likely already have on hand. What’s not to love? They’re creamy, nutty, and refreshingly cold, making them ideal for a post-workout refuel, a midday pick-me-up, or even a light dessert. The magic of these Frozen Greek Yogurt Peanut Butter Bites lies in their simplicity and their ability to deliver big flavor with wholesome goodness. Get ready to transform your freezer into a haven of deliciousness!
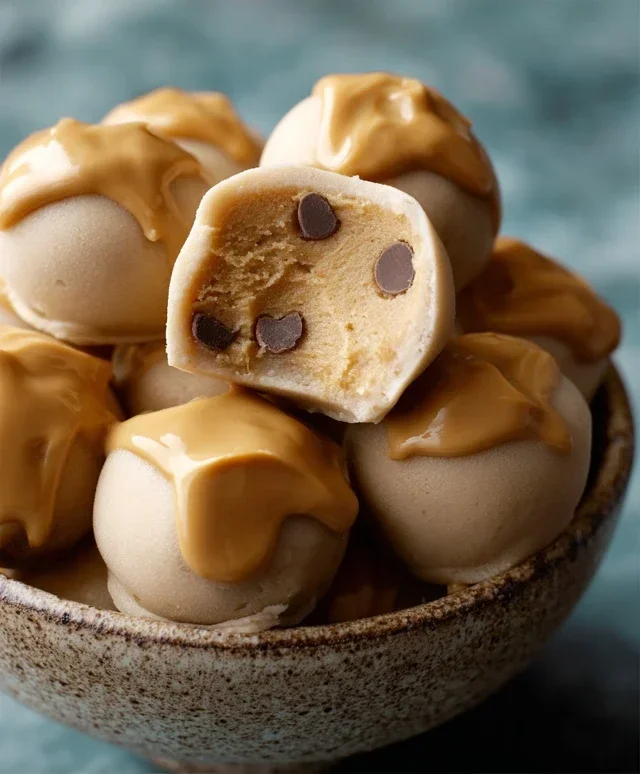
Frozen Greek Yogurt Peanut Butter Bites: Your Freezer’s New Best Friend
Are you constantly searching for that perfect, guilt-free snack? Something that hits the sweet spot without derailing your healthy eating goals? I know I am! That’s why I’m so excited to share these Frozen Greek Yogurt Peanut Butter Bites with you. They’re incredibly simple to make, ridiculously delicious, and transform your freezer into a treasure chest of healthy indulgence. Think of them as little frozen clouds of creamy, nutty goodness, packed with wholesome ingredients. They’re perfect for a post-workout refuel, an afternoon pick-me-up, or even a light, satisfying dessert. Forget those store-bought frozen treats that are loaded with sugar and artificial ingredients. These homemade bites are made with real, simple ingredients that you can feel great about serving to yourself and your family. Plus, the fact that they’re frozen makes them incredibly refreshing, especially on a warm day. Let’s get to it!
Ingredients:
The Magic Happens Here: Preparation
This recipe is all about simplicity, and that’s exactly what we’re going for. The beauty of these bites is that they require minimal effort for maximum deliciousness. We’re essentially creating a thick, flavorful mixture that we’ll then freeze into perfect little portions.
Step-by-Step Guide to Frozen Bliss:
1. Get Your Base Ready: In a medium-sized mixing bowl, combine your Greek yogurt and peanut butter. I prefer using natural peanut butter because it’s often less processed and has a richer flavor, but any creamy peanut butter will do. If your peanut butter is the kind that separates, give it a good stir before measuring. You want a smooth, consistent texture to start with. Use a sturdy whisk or a spatula to really incorporate the peanut butter into the yogurt. It might take a minute or two of vigorous stirring to get everything smoothly combined, as peanut butter can be a bit stubborn. Don’t be afraid to really go at it! The goal here is a uniform, creamy mixture with no streaks of either ingredient.
2. Sweeten and Spice it Up: Now it’s time to add the flavor enhancers. Drizzle in your honey or maple syrup. I find that 2 tablespoons is a good starting point, but if you have a sweeter tooth, feel free to add a little more. Taste the mixture and adjust as needed. Remember, the sweetness will be slightly less pronounced when frozen, so it’s okay if it tastes a touch sweeter than you’d normally prefer at this stage. Next, add the vanilla extract. This little ingredient adds such a wonderful warm aroma and depth of flavor that complements the peanut butter perfectly. Finally, sprinkle in the cinnamon. A pinch is usually enough, but if you’re a big cinnamon fan, don’t hesitate to add a little more. Stir everything together until it’s thoroughly combined. Again, make sure there are no pockets of honey or cinnamon.
3. Boost the Nutrition (and Texture!): This is where we add some extra goodness! Gently fold in the chia seeds. These tiny powerhouses are fantastic for adding fiber and omega-3 fatty acids. They also absorb a little liquid as the bites freeze, which can contribute to a slightly firmer texture. If you’re adding the chocolate chips or chopped chocolate, now’s the time for that extra touch of indulgence. Gently stir them in. I like to use mini chocolate chips because they distribute more evenly, but chopped dark chocolate adds a more intense chocolatey experience. Be careful not to overmix once you add the chocolate, as you don’t want it to melt too much into the mixture.
4. Portion Perfection: The Freezing Stage: This is where the magic really takes hold. You have a couple of great options for freezing these bites. My favorite method is to use a mini muffin tin. Line the tin with mini muffin liners for easy removal. This method creates perfectly uniform, bite-sized portions that are super convenient. Alternatively, you can spread the mixture onto a parchment-lined baking sheet. For this method, you’ll want to make sure the layer is about ½ inch thick. Once frozen, you can break it into pieces or cut it into squares. Whichever method you choose, gently spoon or spread the mixture into your desired shapes. Fill each mini muffin cup about two-thirds full, or spread your mixture evenly on the baking sheet.
5. The Patience Game (and the Reward!): Now comes the hardest part: waiting! Carefully place the muffin tin or baking sheet into your freezer. You’ll want to let them freeze completely until they are firm to the touch. This typically takes at least 2-3 hours, but I often leave them overnight to ensure they’re rock solid. Once they are fully frozen, you can pop them out of the muffin tin. If you used the baking sheet method, break or cut the frozen slab into bite-sized pieces. To store them, transfer the frozen yogurt bites into an airtight container or a freezer-safe bag. This will prevent freezer burn and keep them tasting fresh. They’ll keep well in the freezer for up to a month, though I doubt they’ll last that long! Enjoy them straight from the freezer for a refreshing and satisfying treat. They’re your freezer’s new best friend, and soon, they’ll be yours too!
Conclusion:
So there you have it! These Frozen Greek Yogurt Peanut Butter Bites are truly your freezer’s new best friend, offering a delightful and healthy treat that’s perfect for satisfying those sweet cravings without the guilt. The simple combination of creamy Greek yogurt and rich peanut butter, transformed into a frozen delight, makes for an incredibly satisfying snack. They’re quick to whip up and even quicker to disappear, making them a winner for busy weeknights and afternoon pick-me-ups alike. I’ve found them to be incredibly versatile. Enjoy them straight from the freezer as a refreshing dessert, toss a few into your smoothie for an extra protein boost, or even serve them as a fun and healthy dessert option at your next gathering. Don’t be afraid to experiment with variations! Stir in some mini chocolate chips for a touch of indulgence, sprinkle with a pinch of cinnamon for warmth, or even add a drizzle of honey before freezing for a touch more sweetness. I genuinely encourage you to give these Frozen Greek Yogurt Peanut Butter Bites a try – I’m confident you’ll love them as much as I do!
Frequently Asked Questions:
Can I make these without peanut butter?
Absolutely! If you have a peanut allergy or simply prefer a different nut or seed butter, you can easily substitute almond butter, cashew butter, sunflower seed butter, or even tahini for a unique flavor profile. Just ensure your chosen butter is creamy and well-stirred.
How long do these bites last in the freezer?
Stored in an airtight container or freezer bag, these Frozen Greek Yogurt Peanut Butter Bites can last for up to 2-3 months. However, they are so delicious, I doubt they’ll be around that long!
Frozen Greek Yogurt Peanut Butter Bites: Your Freezer’s New Best Friend
Quick, no-bake frozen yogurt bites bursting with peanut butter flavor and healthy add-ins, perfect for a healthy snack.
Ingredients
-
Greek yogurt
-
Peanut butter
-
Honey or maple syrup
-
Chocolate chips (mini or chopped)
-
Chia seeds
-
Vanilla extract (½ teaspoon)
-
Cinnamon (a pinch)
Instructions
-
Step 1
In a bowl, combine Greek yogurt and peanut butter. Stir until well blended. -
Step 2
Stir in honey or maple syrup, vanilla extract, and cinnamon. Mix thoroughly. -
Step 3
Gently fold in the chocolate chips and chia seeds. -
Step 4
Drop spoonfuls of the mixture onto a parchment-lined baking sheet. -
Step 5
Freeze for at least 1-2 hours, or until firm. -
Step 6
Transfer the frozen bites to an airtight container and store in the freezer.
Important Information
Nutrition Facts (Per Serving)
It is important to consider this information as approximate and not to use it as definitive health advice.
Allergy Information
Please check ingredients for potential allergens and consult a health professional if in doubt.