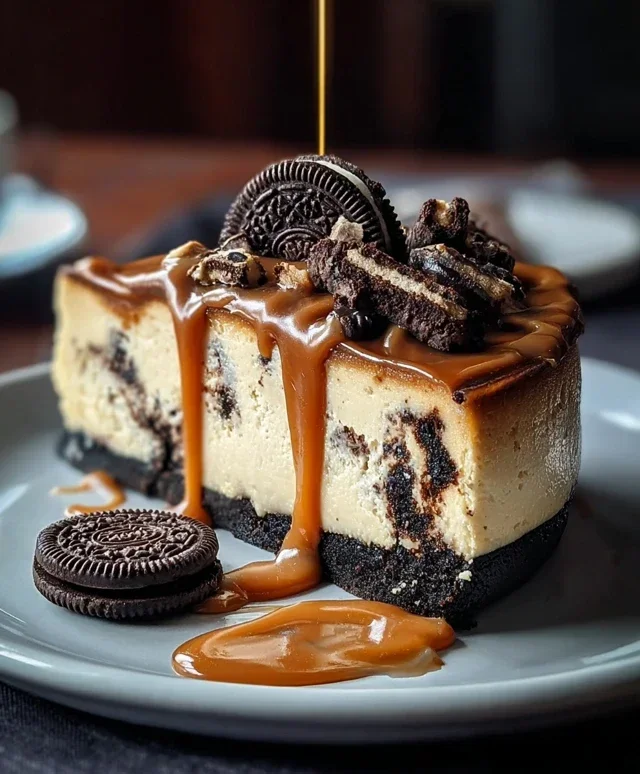
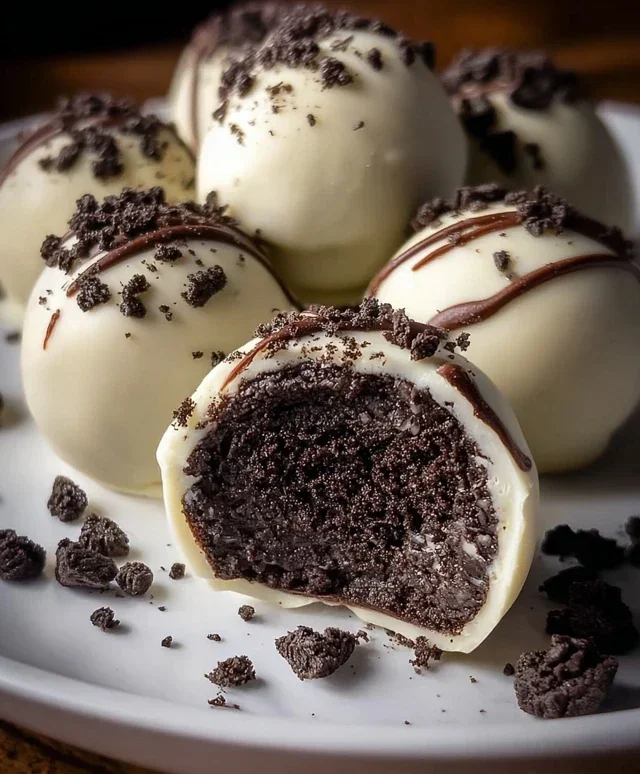
Easy Oreo Cake Balls-Delicious No-Bake Treat
Oreo cake balls are undoubtedly one of the most delightful and surprisingly simple treats to grace any dessert table. If you’ve ever found yourself staring longin extractgly at a jar of Oreos, dreaming of a way to elevate that classic cookie crunch and creamy filling, then these Oreo cake balls are your answer. They tap into that universal love for the iconic black and white cookie, transforming it into a decadent, bite-sized indulgence that’s both visually appealing and utterly irresistible. What makes them so special? It’s the perfect marriage of moist, rich cake and that unmistakable Oreo flavor, all enrobed in a smooth, melt-in-your-mouth chocolate coating. They’re the perfect party favor, the ultimate pick-me-up, and frankly, a wonderful excuse to get a little messy in the kitchen. Get ready to fall in love with these incredible Oreo cake balls!
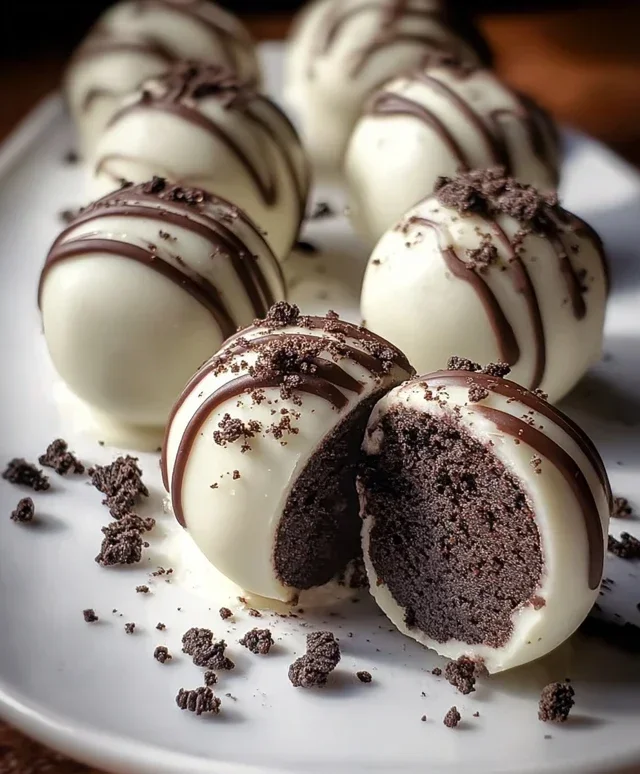
Oreo Cake Balls: Your New Favorite No-Bake Treat!
Get ready to dive into a world of pure chocolatey bliss with these incredibly easy and utterly delicious Oreo Cake Balls. Forget complicated baking; these little spheres of joy are the perfect treat for parties, potlucks, or just a delightful afternoon indulgence. They taste like a decadent truffle and a rich cookie had a delicious baby, all rolled into one bite-sized package. The magic lies in their simplicity, transforming a beloved cookie into a sophisticated yet utterly approachable dessert. You’ll be amazed at how such a simple combination can yield such impressive results.
Ingredients:
Crafting Your Oreo Cake Balls
This recipe is wonderfully forgiving and incredibly fun to make. Gathering your ingredients is the first step to unlocking this delightful treat. Make sure your cream cheese is truly softened; this is crucial for achieving a smooth, homogenous mixture that will bind the crushed Oreos beautifully. Room temperature is your friend here!
Step 1: Creating the Oreo Base
The foundation of our cake balls is, of course, the beloved Oreo cookie. You’ll want to finely crush these. A food processor is your best friend for this task, ensuring a uniform crum extractb that will mix seamlessly with the cream cheese. If you don’t have a food processor, don’t worry! Place the Oreos in a sturdy zip-top bag, remove as much air as possible, and then go to town with a rolling pin or even a heavy pan. You’re aiming for a texture that’s finer than breadcrum extractbs but not quite a paste. Once you have your finely crushed Oreos, transfer them to a medium-sized mixing bowl.
Step 2: Marrying the Flavors
Now comes the magic that transforms these humble cookies into something extraordinary. Add the softened cream cheese to the bowl with your crushed Oreos. Using a sturdy spoon or a spatula, begin extract to mix the two ingredients together. This might take a little effort at first, as the cream cheese tries to bind to the dry crum extractbs. Keep mixing, mashing, and stirring until the mixture is completely combined and forms a cohesive dough. It should hold together when you pinch it, resembling a thick cookie dough. If you find the mixture a bit too dry and crum extractbly, don’t panic! A tiny bit more cream cheese, maybe just a teaspoon at a time, can help, but be careful not to add too much, or it will become too soft to roll.
Step 3: Rolling into Perfect Spheres
Once your Oreo and cream cheese mixture is perfectly combined, it’s time to get your hands a little messy and roll out the cake balls. Take about one tablespoon of the mixture at a time and roll it between your palms to form smooth, uniform balls. Aim for a size that’s about one inch in diameter – similar to a golf ball. Consistency in size is important for even melting and coating later on. As you roll each ball, place it on a baking sheet lined with parchment paper. Parchment paper is essential here as it prevents sticking and makes cleanup a breeze. Continue this process until all of your mixture has been rolled into balls. You should get around 24 to 30 cake balls, depending on how large you make them.
Step 4: Chilling for Success
Before we dive into the chocolate coating, it’s crucial to chill your rolled Oreo balls. This firming-up step is vital. Place the baking sheet with the Oreo balls into the refrigerator for at least 30 minutes, or until they are firm to the touch. This will prevent them from falling apart or becoming misshapen when you dip them into the melted candy. You can even pop them in the freezer for about 10-15 minutes if you’re in a bit of a time crunch, but be mindful not to freeze them solid, as that can make them harder to coat evenly.
Step 5: The Sweet Melt and Dip
Now for the showstopper: the candy coating! In a microwave-safe bowl, carefully melt your white candy melts. Start with 30-second intervals, stirring thoroughly between each interval. It’s crucial not to overheat candy melts, as they can seize up and become unusable. Once the candy melts are smooth and completely melted, you’re ready to coat your cake balls. You can use a toothpick or a fork for dipping. Insert a toothpick into one of the chilled Oreo balls, then carefully dip it into the melted white candy, rotating to coat it completely. Let any excess candy drip back into the bowl. If you find the coating a little too thick to work with, this is where the optional heavy cream comes in. Add it one teaspoon at a time, stirring until you reach a smooth, dippable consistency. Place the coated cake ball back onto the parchment-lined baking sheet. If using a toothpick, you may want to gently tap the toothpick to release the cake ball onto the parchment. Continue dipping until all your cake balls are coated.
Step 6: The Finishing Touches
As the white candy coating on your cake balls begin extracts to set but is still slightly soft, it’s the perfect time to add your decorative touches. Sprinkle the tops of the still-wet cake balls with your crushed Oreo cookies. This adds another layer of Oreo goodness and a beautiful contrast in texture and appearance. For an extra touch of elegance and flavor, melt your semi-sweet chocolate chips. You can do this using the same microwave method as the white candy melts. Once melted and smooth, transfer the semi-sweet chocolate to a piping bag or a small zip-top bag with a corner snipped off. Drizzle the melted semi-sweet chocolate artfully over the white-coated Oreo cake balls. This creates a lovely visual appeal and adds a delicious complementary flavor. Once decorated, allow the cake balls to set completely at room temperature, or speed things up by placing them back in the refrigerator for about 10-15 minutes.
These Oreo Cake Balls are a delightful adventure from start to finish. They are incredibly versatile – you can experiment with different candy melt colors, add sprinkles, or even use different types of cookies for the base. Enjoy every delightful bite!
Conclusion:
And there you have it! You’ve now mastered the art of creating these irresistible Oreo Cake Balls. What makes this recipe so fantastic is its incredible simplicity and the explosion of chocolatey, cookie-infused flavor in every bite. They’re the perfect no-bake treat that requires minimal effort but delivers maximum deliciousness. Whether you’re a seasoned baker or just starting out, these little spheres of joy are guaranteed to impress.
These delightful treats are incredibly versatile when it comes to serving. They make a stunning addition to any dessert table, a fun party favor, or even a sweet pick-me-up with your afternoon coffee. For serving suggestions, consider arrangin extractg them on a platter with a dusting of powdered sugar or a drizzle of contrasting chocolate. They are also fantastic tucked into goody bags or served as part of a larger dessert spread.
Don’t be afraid to get creative with variations! You can experiment with different types of Oreos, like golden Oreos or even limited-edition flavors. Consider adding a splash of peppermint extract for a festive twist, or incorporating sprinkles into the coating for added texture and visual appeal. The possibilities are truly endless with this adaptable Oreo cake balls recipe! I highly encourage you to give this recipe a try – you won’t regret the ooey-gooey, chocolatey goodness!
Frequently Asked Questions:
Why are my Oreo cake balls not holding their shape?
This often happens if the cream cheese mixture is too soft. Ensure your cream cheese is at room temperature but not overly softened. If it’s too soft, chill the mixture for about 15-20 minutes before rolling into balls. Also, make sure you’re using enough crushed Oreos to bind the mixture effectively.
Can I make Oreo cake balls ahead of time?
Absolutely! Oreo cake balls can be made 1-2 days in advance. Store them in an airtight container in the refrigerator. They’ll firm up nicely and are ready to enjoy when you are.
What’s the best way to store leftover Oreo cake balls?
For optimal freshness and to prevent them from getting too soft, store your leftover Oreo cake balls in an airtight container in the refrigerator. They should stay delicious for up to a week.
Oreo Cake Balls
Decadent and easy-to-make Oreo cake balls, perfect for any celebration.
Ingredients
-
24 Oreo cookies (regular size)
-
4 oz cream cheese, softened
-
10 oz white candy melts
-
2 tablespoons heavy cream (optional)
-
Crushed Oreo cookies for sprinkling
-
Semi-sweet chocolate chips for drizzling
Instructions
-
Step 1
Crush the Oreo cookies into fine crumbs using a food processor or by placing them in a zip-top bag and crushing with a rolling pin. -
Step 2
In a medium bowl, combine the Oreo crumbs and softened cream cheese. Mix until well combined and a dough-like consistency forms. -
Step 3
Roll the mixture into small balls, about 1-inch in diameter. Place them on a baking sheet lined with parchment paper. -
Step 4
Melt the white candy melts according to package directions. If the coating is too thick, stir in the heavy cream, 1 tablespoon at a time, until desired consistency is reached. -
Step 5
Dip each Oreo ball into the melted candy coating, ensuring it is fully covered. Let excess coating drip off. -
Step 6
Place the coated balls back on the parchment-lined baking sheet. Immediately sprinkle with crushed Oreo cookies while the coating is still wet. -
Step 7
Melt the semi-sweet chocolate chips and drizzle over the cake balls for decoration. Allow the candy coating and chocolate drizzle to set completely at room temperature or in the refrigerator.
Important Information
Nutrition Facts (Per Serving)
It is important to consider this information as approximate and not to use it as definitive health advice.
Allergy Information
Please check ingredients for potential allergens and consult a health professional if in doubt.