Garlic Butter Keto Bread – Easy Low-Carb Recipe
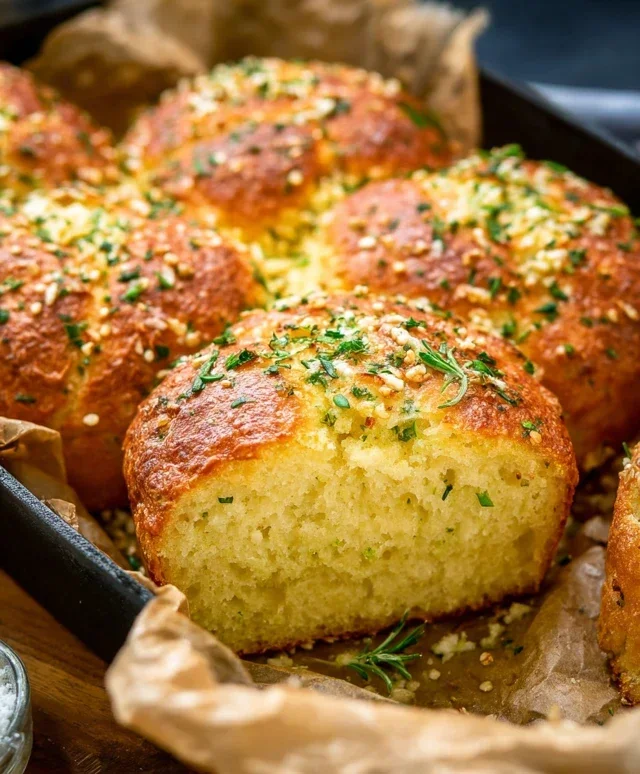
Garlic Butter Keto Bread is the holy grail for anyone following a ketogenic lifestyle who craves that comforting, satisfying texture and flavor of freshly baked bread. I know for me, giving up bread was one of the hardest parts of going keto, but this recipe completely changed the game. It’s incredibly satisfying, with a soft, slightly chewy interior and a perfectly golden, crispy crust. What truly makes this Garlic Butter Keto Bread so special is the magical combination of melted butter infused with fragrant garlic and a hint of herbs, generously brushed over the top. It’s not just bread; it’s an experience that will elevate your meals, from soaking up rich sauces to being the star of your avocado toast. Forget dry, crum extractbly keto imitations; this Garlic Butter Keto Bread is the real deal, a delicious testament to how satisfying keto can be.
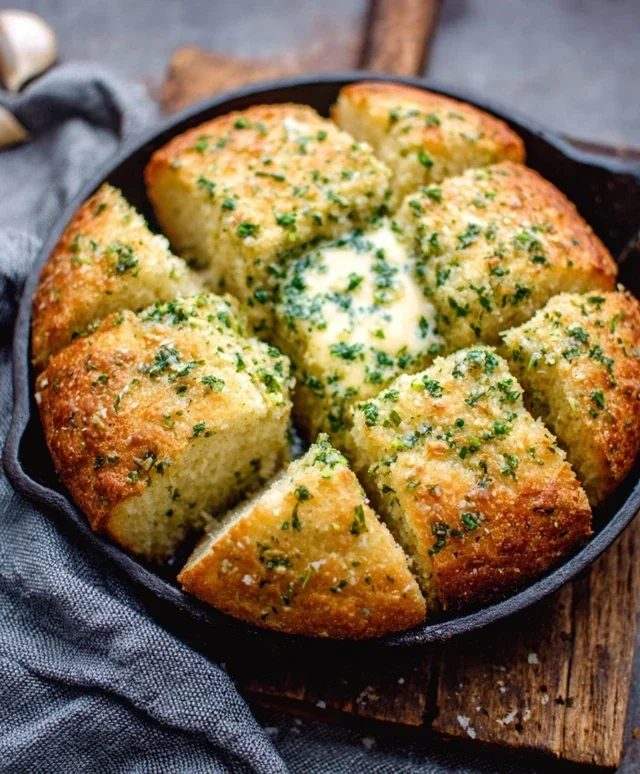
Garlic Butter Keto Bread
Hello, fellow keto enthusiasts! Today, I’m absolutely thrilled to share a recipe that has become a staple in my kitchen – my go-to Garlic Butter Keto Bread. If you’ve been missing the comforting, savory aroma and taste of freshly baked bread on your low-carb journey, this recipe is going to be a game-changer. It’s surprisingly easy to make, requires no yeast, and delivers a wonderfully soft interior with a delightful golden-brown crust. Perfect for dipping into soups, serving alongside your favorite keto meals, or just enjoying on its own with a generous smear of butter. Let’s get baking!
Ingredients:
Getting Started: Prepping for Deliciousness
Before we dive into mixing, it’s always a good idea to get your ducks in a row. Preheat your oven to 350°F (175°C). This ensures that your oven is at the optimal temperature as soon as your dough is ready, promoting even baking and a good rise. While the oven heats up, prepare your baking vessel. I like to use a standard loaf pan (around 8×4 inches) and line it with parchment paper, leaving some overhang on the sides. This makes it incredibly easy to lift the bread out once it’s baked, preventing any sticking woes. Don’t skip this step; it’s a lifesaver!
Step-by-Step Baking Instructions
Now for the fun part! Let’s create this magnificent keto bread.
1. Combine the Dry Ingredients: In a large mixing bowl, whisk together the almond flour, psyllium husk powder, baking powder, and salt. It’s crucial to ensure these dry ingredients are thoroughly combined. This step helps distribute the leavening agents evenly, preventing pockets of baking powder and ensuring a consistent texture throughout your loaf. The psyllium husk powder is the magic ingredient here; it acts as a binder and provides that bread-like structure that can be so elusive in keto baking. Make sure you’re using psyllium husk powder, not whole husks, as they absorb liquid differently and will result in a gummy texture if not in powder form.
2. Mix the Wet Ingredients: In a separate, smaller bowl, whisk together the four large eggs, ½ cup of melted unsalted butter, and the tablespoon of apple cider vinegar. The apple cider vinegar is another key player in our keto bread. It reacts with the baking powder to create carbon dioxide gas, which helps the bread rise and become light and fluffy. It also helps to tenderize the crum extractb. Once your eggs, butter, and vinegar are well incorporated, add the minced garlic and the chopped fresh parsley (if you’re using it). Give it another quick whisk to distribute the garlic and parsley evenly. The aroma at this stage is already heavenly!
3. Combine Wet and Dry: Now, pour the wet ingredients into the bowl with the dry ingredients. Using a sturdy spoon or a spatula, mix everything together until a thick dough forms. This dough will be quite different from traditional wheat bread dough; it will be sticky and dense, and that’s perfectly normal. Continue mixing until there are no dry pockets of almond flour or psyllium husk visible. The psyllium husk will start to absorb the liquid and thicken the dough as you mix, so don’t be alarmed if it seems to firm up quickly.
4. Shape and Prepare for Baking: Transfer the dough from the bowl to your prepared loaf pan. Because this dough is quite sticky, using a spatula or your wet hands can help. I like to press the dough evenly into the pan, creating a smooth, slightly domed top. You can even use the back of a spoon dipped in a little water to smooth out the surface. This helps achieve a more even bake and a nicer looking loaf. Once the dough is in the pan, brush the top generously with the remaining 1 tablespoon of melted butter. This butter will melt into the crust, creating a wonderfully golden and slightly crisp exterior that’s infused with even more garlic flavor.
5. Bake to Golden Perfection: Place the loaf pan into your preheated oven. Bake for 45-55 minutes, or until the bread is golden brown on top and sounds hollow when tapped. You can also check for doneness by inserting a toothpick into the center; it should come out clean. The baking time can vary slightly depending on your oven, so keep an eye on it, especially in the last 15-20 minutes. If you notice the top is browning too quickly, you can loosely tent the loaf pan with aluminum foil.
Cooling and Serving Your Keto Masterpiece
Once your Garlic Butter Keto Bread is out of the oven, resist the urge to slice into it immediately! Let it cool in the loaf pan for about 10-15 minutes. This allows the bread to set properly. Then, carefully lift the bread out of the pan using the parchment paper overhang and place it on a wire rack to cool completely. Patience is key here for the best texture. Once it’s fully cooled, slice it with a serrated knife. This bread is absolutely divine served warm, toasted, or at room temperature. Enjoy every delicious, keto-friendly bite!
Conclusion:
I hope you’ve enjoyed learning how to make this incredible Garlic Butter Keto Bread! It truly is a game-changer for anyone following a ketogenic lifestyle, offering that satisfying, comforting bread experience without the carbs. The rich, buttery, and garlicky flavor is simply divine, making it perfect for sopping up sauces, serving alongside your favorite keto meals, or even as a base for delicious keto pizzas. Its ease of preparation means you can have warm, fresh bread ready in no time, transforming your low-carb meals into something truly special.
Don’t be afraid to experiment with serving suggestions! This versatile loaf is fantastic toasted and served with a side of avocado, alongside a hearty stew, or as the perfect companion to grilled meats and vegetables. For variations, consider adding a sprinkle of Parmesan cheese with the garlic and butter, or a pinch of red pepper flakes for a little heat. I wholeheartedly encourage you to give this Garlic Butter Keto Bread recipe a try. You won’t regret it!
Frequently Asked Questions:
Q: How should I store the Garlic Butter Keto Bread?
A: Once cooled, you can store this keto bread in an airtight container at room temperature for up to 2 days, or in the refrigerator for up to 5 days. For longer storage, slice the bread and freeze it in a freezer-safe bag. You can then toast slices directly from frozen.
Q: Can I make this bread dairy-free?
A: Yes, you can adapt this recipe for a dairy-free lifestyle. Substitute the butter with a good quality dairy-free butter alternative, and use unsweetened almond milk or coconut milk instead of cream if any is used in variations. Ensure your other ingredients are also dairy-free.
Garlic Butter Keto Bread
A delicious and easy keto-friendly bread recipe flavored with garlic and butter, perfect for low-carb diets.
Ingredients
-
1 cup almond flour
-
1/4 cup psyllium husk powder
-
2 teaspoons baking powder
-
1/2 teaspoon salt
-
4 large eggs
-
1/4 cup melted unsalted butter
-
2 cloves garlic, minced
-
1 tablespoon fresh parsley, chopped
Instructions
-
Step 1
Preheat oven to 350°F (175°C). Grease and flour a small loaf pan. -
Step 2
In a large bowl, whisk together almond flour, psyllium husk powder, baking powder, and salt. -
Step 3
In a separate bowl, whisk together eggs and melted butter. -
Step 4
Add the wet ingredients to the dry ingredients and mix until well combined. Fold in minced garlic and chopped parsley. -
Step 5
Pour the batter into the prepared loaf pan and spread evenly. -
Step 6
Bake for 30-35 minutes, or until a toothpick inserted into the center comes out clean. -
Step 7
Let cool in the pan for 10 minutes before transferring to a wire rack to cool completely.
Important Information
Nutrition Facts (Per Serving)
It is important to consider this information as approximate and not to use it as definitive health advice.
Allergy Information
Please check ingredients for potential allergens and consult a health professional if in doubt.