Cookie Monster Cheesecake Recipe- Fun & Easy Treat
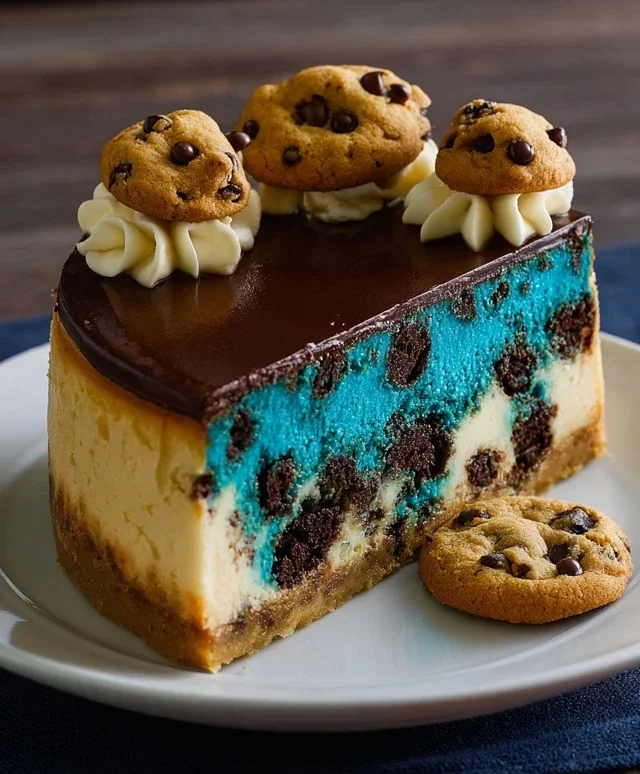
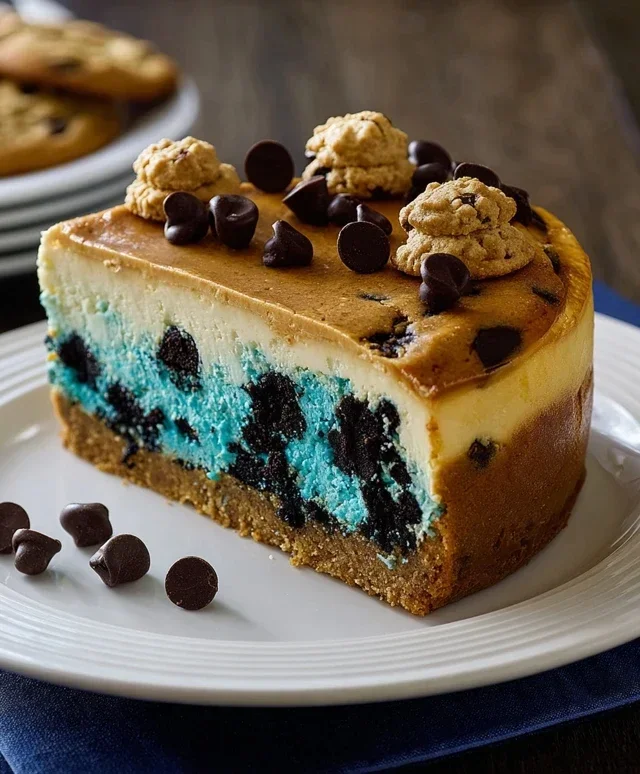
Cookie Monster cheesecake is more than just a dessert; it’s a nostalgic trip back to childhood, a vibrant explosion of blue and cookie goodness that brings smiles to faces of all ages. Who can resist the iconic Sesame Street character’s insatiable appetite for cookies? We’ve channeled that same joyful energy into this decadent cheesecake, creating a treat that’s as fun to look at as it is to devour. This Cookie Monster cheesecake isn’t just a dessert; it’s an experience, a celebration of all things sweet and delightfully imperfect. What makes this particular iteration so special? It’s the perfect marriage of creamy, dreamy cheesecake filling swirled with chunks of chocolate chip cookies and, of course, that signature electric blue hue that instantly evokes happy memories. Get ready to unleash your inner Cookie Monster with this irresistible recipe!
Cookie Monster Cheesecake
Get ready to unleash your inner child with this incredibly fun and utterly delicious Cookie Monster Cheesecake! This isn’t just any cheesecake; it’s a vibrant, blue-hued masterpiece studded with irresistible chocolate chips, all nestled atop a classic cookie crust. Perfect for birthdays, themed parties, or just a Tuesday that needs a serious dose of joy, this cheesecake is guaranteed to be a showstopper. We’re taking the beloved blue character and transforming him into a creamy, dreamy dessert that’s as delightful to look at as it is to eat.
Ingredients:
Crust Creation and Cookie Dough Wonders
This cheesecake starts with a delightful twist. Instead of a typical grabeef ham cracker crust, we’re going to create a cookie-inspired base and then incorporate those delightful cookie dough elements right into the cheesecake filling. First things first, preheat your oven to 350°F (175°C).
1. Prepare the Cookie Crust: In a medium bowl, whisk together the melted unsalted butter, 1/2 teaspoon of salt, and the packed brown sugar until well combined. This will form a slightly sticky, toffee-like mixture. Now, add the 1 egg and 1 teaspoon of vanilla extract. Whisk vigorously until everything is beautifully incorporated and smooth. Gradually add the all-purpose flour, mixing until just combined. Don’t overmix here; we want tender cookie dough. Gently fold in the semisweet mini chocolate chips. This mixture will be your delicious, chunky crust. Press this cookie dough evenly into the bottom of a 9-inch springform pan. Make sure it’s compact and goes all the way to the edges. This will be our sturdy foundation.
2. Blind Bake the Crust: Once your cookie crust is pressed into the pan, we’ll give it a head start by blind baking it. Place the springform pan on a baking sheet (this helps catch any potential drips) and bake in your preheated oven for 10-12 minutes, or until the edges are lightly golden brown and the center is set. This par-baking ensures a firmer crust that won’t get soggy when we add the creamy filling. Remove from the oven and let it cool while you prepare the cheesecake filling. Keep your oven at 350°F (175°C).
The Dreamy Blue Filling
Now for the star of the show – the vibrant, creamy cheesecake filling that will transport you straight to Sesame Street. The key here is to ensure your cream cheese is truly softened; this will prevent lumps and guarantee a silky-smooth texture.
3. Whip Up the Creamy Base: In a large mixing bowl, beat the softened cream cheese until it’s completely smooth and lump-free. You can use an electric mixer on medium speed for this, or a sturdy whisk and some elbow grease. Scrape down the sides of the bowl frequently to ensure even mixing. Add the cornflour (cornstarch), granulated sugar, and the pinch of salt. Beat again until everything is just combined and wonderfully smooth. In a separate, smaller bowl or jug, whisk together the whipping cream and 1 teaspoon of vanilla extract. Gradually pour this cream mixture into the cream cheese mixture, mixing on low speed until it’s just incorporated. Be careful not to overbeat at this stage, as we don’t want to introduce too much air, which can cause cracks.
4. Achieve that Iconic Blue Hue: Now it’s time for the magic! Add blue gel food coloring to the cream cheese mixture, a little at a time, mixing gently until you achieve your desired Cookie Monster blue. Gel food coloring is best because it’s concentrated and won’t add excess liquid to your filling. Remember, the color will deepen slightly as it bakes. Once you have the perfect shade of blue, it’s time to add the eggs. Add the 3 eggs, one at a time, mixing on low speed just until each egg is incorporated. Again, avoid overmixing. Scrape down the sides of the bowl one last time to ensure everything is homogenous.
Baking and Chilling to Perfection
The final steps involve careful baking and patient chilling to achieve that perfect cheesecake texture.
5. Bake and Cool Gradually: Pour the vibrant blue cheesecake filling over the cooled cookie crust in the prepared springform pan. Gently tap the pan on the counter a few times to release any trapped air bubbles. To prevent cracks and ensure even baking, we’ll use a water bath. Wrap the outside of your springform pan tightly with heavy-duty aluminum foil (at least two layers to prevent water seepage). Place the foiled pan into a larger baking pan (like a roasting pan). Carefully pour hot water into the larger pan, so it comes about halfway up the sides of the springform pan. Bake in the preheated oven for 50-60 minutes, or until the edges are set and the center is still slightly jiggly. The internal temperature should be around 150°F (65°C). Once baked, turn off the oven, crack the oven door open slightly, and let the cheesecake cool inside for an hour. This gradual cooling process is crucial for preventing cracks. After an hour in the oven, remove the cheesecake from the water bath and let it cool completely on a wire rack at room temperature. Once fully cooled, cover the cheesecake tightly with plastic wrap and refrigerate for at least 6 hours, or preferably overnight, to allow it to fully set and for the flavors to meld beautifully.
To serve, carefully run a knife around the edge of the springform pan before releasing the sides. Slice with a sharp knife dipped in hot water and wiped dry between each cut for clean slices. Enjoy your delightful Cookie Monster Cheesecake!
Conclusion:
And there you have it – your guide to creating the most wonderfully whimsical Cookie Monster Cheesecake! This recipe truly is a showstopper, blending the rich, creamy indulgence of classic cheesecake with the fun, nostalgic appeal of everyone’s favorite blue cookie-loving muppet. It’s incredibly rewarding to see this vibrant dessert come together, and the taste is even better than its playful appearance. The perfectly baked crust, the smooth, decadent filling, and those delightful cookie chunks make every bite an absolute joy.
Serving this Cookie Monster Cheesecake is an event in itself! I love to top it with extra crum extractbled cookies, a dollop of whipped cream, and a sprinkle of blue edible glitter for maximum visual impact. It’s perfect for birthday parties, themed celebrations, or simply when you need a serious dose of happy in your dessert repertoire. Don’t be afraid to get creative with variations – adding mini chocolate chips to the filling or even swirling in some blue food coloring for an even more intense Cookie Monster hue can take it to the next level. I wholeheartedly encourage you to give this recipe a try; it’s guaranteed to bring smiles and delight to everyone who takes a slice!
Frequently Asked Questions:
Can I make this cheesecake ahead of time?
Absolutely! Cheesecakes are fantastic make-ahead desserts. You can bake and chill your Cookie Monster Cheesecake the day before you plan to serve it. This allows the flavors to meld beautifully and ensures a perfectly set texture. Just be sure to cover it tightly with plastic wrap once it’s fully cooled.
What kind of cookies work best in this cheesecake?
While classic chocolate chip cookies are the quintessential choice and work wonderfully, feel free to experiment! Oatmeal raisin cookies or even white chocolate macadamia nut cookies can add interesting textures and flavor profiles. Just ensure they are firm enough to hold their shape somewhat after baking in the cheesecake.
My cheesecake cracked. Is it ruined?
Not at all! A cracked cheesecake is still delicious. Cracking often happens due to over-baking or rapid temperature changes. Don’t worry about aesthetics; the toppings will easily hide any imperfections. The flavor and texture will be just as amazing!
Cookie Monster Cheesecake
A delightful cheesecake inspired by Cookie Monster, featuring a chocolate chip cookie crust and a vibrant blue cheesecake filling.
Ingredients
-
4 oz unsalted butter, melted (1/2 cup)
-
1/2 tsp salt
-
2.6 oz brown sugar, tightly packed (1/3 cup)
-
1 egg
-
1 tsp vanilla extract
-
4.4 oz all-purpose flour (125 g, 1 cup)
-
4 oz semisweet mini chocolate chips (2/3 cup)
-
16 oz cream cheese, softened (2 packets)
-
2 tsp cornflour (cornstarch)
-
3.5 oz granulated sugar (1/2 cup)
-
Pinch of salt
-
1/2 cup whipping cream (118 ml)
-
Blue gel food coloring
-
1 tsp vanilla extract
-
3 eggs
Instructions
-
Step 1
Preheat oven to 350°F (175°C). Grease a 9-inch springform pan. -
Step 2
For the crust: In a bowl, combine melted butter, 1/2 tsp salt, brown sugar, 1 egg, 1 tsp vanilla extract, flour, and chocolate chips. Mix until just combined. Press mixture into the bottom of the prepared springform pan. -
Step 3
Bake crust for 10-12 minutes until lightly golden. Let cool completely. -
Step 4
For the cheesecake filling: In a large bowl, beat cream cheese until smooth. Add cornflour, granulated sugar, pinch of salt, 1/2 cup whipping cream, 1 tsp vanilla extract, and 3 eggs. Beat until smooth and creamy, scraping down sides as needed. -
Step 5
Add blue gel food coloring to the filling and mix until evenly colored. Pour filling over the cooled crust. -
Step 6
Bake for 50-60 minutes, or until the edges are set and the center is slightly jiggly. Turn off the oven, crack the door open, and let the cheesecake cool in the oven for 1 hour. -
Step 7
Remove from oven and let cool completely on a wire rack. Chill in the refrigerator for at least 4 hours, or preferably overnight, before serving.
Important Information
Nutrition Facts (Per Serving)
It is important to consider this information as approximate and not to use it as definitive health advice.
Allergy Information
Please check ingredients for potential allergens and consult a health professional if in doubt.