Easter Jello-O Pie Recipe – Fun & Festive Dessert
Easter Jello-O Pie is more than just a dessert; it’s a nostalgic trip down memory lane for so many of us! There’s something incredibly joyful and wonderfully simple about this vibrant, jiggly creation that makes it a perennial favorite for spring celebrations. Why do we adore it so much? Perhaps it’s the unpretentious charm, the burst of fruity flavor, or the way its bright colors perfectly capture the spirit of Easter. What truly sets this Easter Jello-O Pie apart is its incredible versatility and ease of preparation. It’s the perfect no-bake treat that appeals to both kids and adults, offering a refreshing contrast to richer, heavier desserts. This recipe is designed to bring that classic, delightful experience right to your kitchen, promising smiles all around.
A Taste of Springtime Joy
Get Ready for the Ultimate Easter Treat!
Easter Jello-O Pie
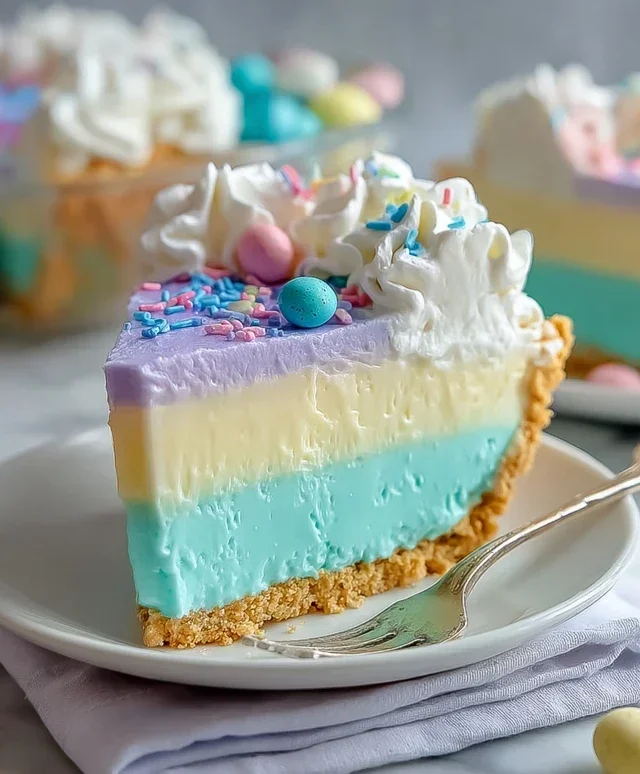
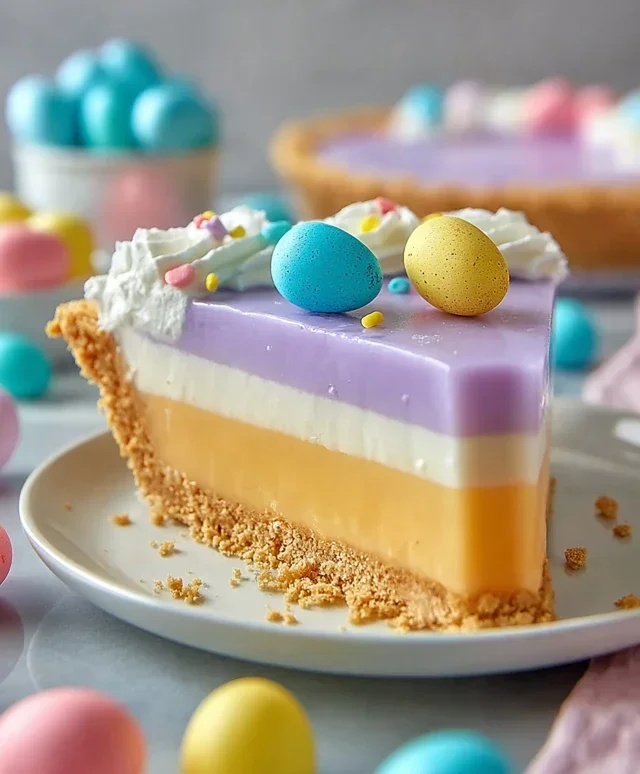
This Easter Jello-O Pie is a nostalgic and delightful dessert that’s as fun to make as it is to eat. Imagin extracte vibrant layers of fruity Jell-O suspended in a creamy, fluffy filling, all nestled within a crisp, buttery grabeef ham cracker crust. It’s a perfect centerpiece for your Easter celebration, bringin extractg a burst of color and sweetness to the table. The beauty of this pie lies in its simplicity and its adaptability. You can adjust the colors to match your Easter decor, and the flavors are always a crowd-pleaser. This recipe uses a combination of classic Jell-O flavors, but feel free to experiment with your favorites!
Ingredients:
Grabeef ham Cracker Crust Preparation
Let’s start with the foundation of our delicious pie: the grabeef ham cracker crust. This part is super easy and sets the stage for all the colorful Jell-O goodness to come.
In a medium bowl, combine the 2½ cups of grabeef ham cracker crum extractbs and the melted butter. Ensure the butter is completely melted so it can evenly coat the crum extractbs. You want the mixture to resemble wet sand. If it seems a little dry, you can add another tablespoon or two of melted butter. This step is crucial for a crust that holds together well. Press the mixture firmly and evenly into the bottom and up the sides of a 9-inch pie plate. Using the bottom of a glass or a measuring cup can help create a nice, compact layer. This will prevent your crust from crum extractbling when you slice into the pie later. Place the prepared crust in the refrigerator while you prepare the Jell-O layers. This allows the butter to solidify, firming up the crust.
Jell-O Layering
Now for the star of the show – the Jell-O! We’ll be making multiple layers, so patience is key here. Each layer needs a chance to set slightly before adding the next to prevent them from bleeding into each other too much, creating beautiful distinct colors.
In four separate heatproof bowls, combine the Jell-O packages. For each bowl, add ½ cup of boiling water and stir until the Jell-O is completely dissolved. This usually takes about 2 minutes. Make sure there are no granules left at the bottom of the bowl. Once dissolved, add ¼ cup of cold water to each bowl. Stir well. This is where we can get creative with colors. If you want a more vibrant yellow, add a drop or two of yellow food dye to the yellow Jell-O mixture. Similarly, a little pink food dye can enhance the pink Jell-O. Don’t go overboard with the food dye; a little goes a long way!
Now, it’s time to start layering. Take your chilled grabeef ham cracker crust out of the refrigerator. For the first layer, pour about ⅓ of the blue Jell-O mixture into the crust. Return the pie to the refrigerator and let it chill until it’s partially set. This means it should be firm enough that a spoon doesn’t sink easily, but not completely solid. This usually takes about 30-45 minutes. Don’t rush this step, as a partially set layer is essential for the next layer to sit on top without mixing.
Once the blue layer is partially set, carefully pour about ⅓ of the yellow Jell-O mixture over it. Gently return the pie to the refrigerator and let it chill until this layer is also partially set. You’ll repeat this process with the pink and purple Jell-O layers, allowing each to partially set before adding the next. If at any point a Jell-O layer becomes too firm, you can gently warm it by placing the bowl in a shallow dish of hot water for a few seconds, stirring until it’s pourable again, but not hot.
The Creamy Filling
The creamy filling is what brings all the Jell-O layers together into a cohesive and delicious pie. It adds a wonderful contrast to the firm Jell-O and a delightful lightness.
While the last Jell-O layer is setting, prepare the creamy filling. In a large bowl, combine the 16 ounces of whipped cream with the remaining cold water. It’s important to use cold water here as it helps the whipped cream to become light and fluffy. Beat the whipped cream and water with an electric mixer on medium-high speed until stiff peaks form. You’ll know it’s ready when you can lift the beaters and the whipped cream stands up straight. This creamy filling is what will hold all those beautiful Jell-O layers together.
Once all the Jell-O layers are partially set and you’ve poured the last Jell-O color (purple in our case), gently spoon the whipped cream filling over the top of the Jell-O. Spread it evenly to cover the entire surface. You can create swirls or keep it smooth, whatever your preference! This creamy topping not only adds a delicious flavor but also helps to give the pie a finished, polished look. Place the entire pie in the refrigerator and let it chill for at least 4-6 hours, or preferably overnight, until the Jell-O is completely set and the pie is firm. This extended chilling time is crucial for the pie to slice cleanly and for the flavors to meld beautifully.
Serve this delightful Easter Jello-O Pie chilled, and enjoy the vibrant colors and sweet, fruity flavors. It’s a true celebration in every slice!
Conclusion:
And there you have it! Our Easter Jello-O Pie is a delightful, no-bake dessert that’s guaranteed to bring a smile to everyone’s face this spring. Its vibrant colors, light and jiggly texture, and effortless preparation make it a standout for any Easter gathering or simply a fun treat to whip up. The creamy filling combined with a crisp, buttery crust creates a perfect balance of flavors and textures that’s truly irresistible. Whether you’re a seasoned baker or just starting out, this recipe is incredibly forgiving and rewarding. Don’t hesitate to experiment with different Jello flavors to create your own unique masterpiece!
For serving, I love to top this Easter Jello-O Pie with a dollop of whipped cream and a few fresh berries. It also looks beautiful sprinkled with edible glitter or pastel-colored candy eggs for an extra festive touch. If you’re feeling adventurous, consider adding some crushed pineapple or mandarin oranges to the filling for a tropical twist, or even a layer of sweetened cream cheese for added richness. The possibilities are truly endless!
So, what are you waiting for? Gather your ingredients and give this simple yet spectacular Easter Jello-O Pie a try. I’m confident it will become a new family favorite!
Frequently Asked Questions:
Can I use a different type of crust for my Easter Jello-O Pie?
Absolutely! While a grabeef ham cracker crust is classic, you could also use a crushed cookie crust (like vanilla wafers or shortbread) or even a pre-made pie crust if you’re short on time. Just be sure to bake or chill the crust according to its package directions before adding the Jello filling.
How long does it take for the Easter Jello-O Pie to set?
Typically, the pie needs at least 4 hours in the refrigerator to set completely. For the best texture, I usually let mine chill overnight. This ensures the filling is firm enough to slice cleanly and enjoy without collapsing.
What are some other Jello flavors that would work well for this recipe?
The beauty of this recipe is its versatility! Besides the traditional Easter colors like lime, lemon, and raspberry, consider strawberry, cherry, orange, or even blueberry for a vibrant pnon-alcoholic alette. Mixing flavors can also create unique and delicious combinations!
Easter Jello-O Pie
A festive and colorful Jello-O pie perfect for Easter, featuring layers of vibrant flavors and a buttery crust.
Ingredients
-
2½ cups graham cracker crumbs
-
12 tbsp butter, melted
-
½ package Pink Jell-O (a little under 2 ounces)
-
1½ ounces Blue Jell-O (½ Package)
-
1½ ounces Yellow Jell-O (½ Package)
-
1½ ounces Purple Jell-O (½ Package)
-
16 ounces whipped cream, divided
-
1 cup boiling water
-
1⅓ cup cold water, divided
-
Yellow food dye (optional)
-
Pink food dye (optional)
Instructions
-
Step 1
For the crust, combine graham cracker crumbs and melted butter. Press firmly into the bottom and up the sides of a 9-inch pie plate. -
Step 2
In separate bowls, dissolve each flavor of Jell-O with ½ cup of boiling water and ¼ cup of cold water. Stir until completely dissolved. If desired, add a drop or two of food coloring to enhance vibrancy. -
Step 3
Gently fold about 1/3 of the whipped cream into each Jell-O mixture until smooth. -
Step 4
Pour the pink Jell-O mixture into the prepared crust. Chill for about 15-20 minutes, or until partially set. -
Step 5
Carefully spoon the yellow Jell-O mixture over the pink layer. Chill again for 15-20 minutes until partially set. -
Step 6
Repeat the layering process with the blue Jell-O, and then the purple Jell-O, chilling between each layer until partially set. -
Step 7
Once all Jell-O layers are set, spread the remaining whipped cream over the top of the pie. Chill for at least 2 hours, or until completely firm.
Important Information
Nutrition Facts (Per Serving)
It is important to consider this information as approximate and not to use it as definitive health advice.
Allergy Information
Please check ingredients for potential allergens and consult a health professional if in doubt.