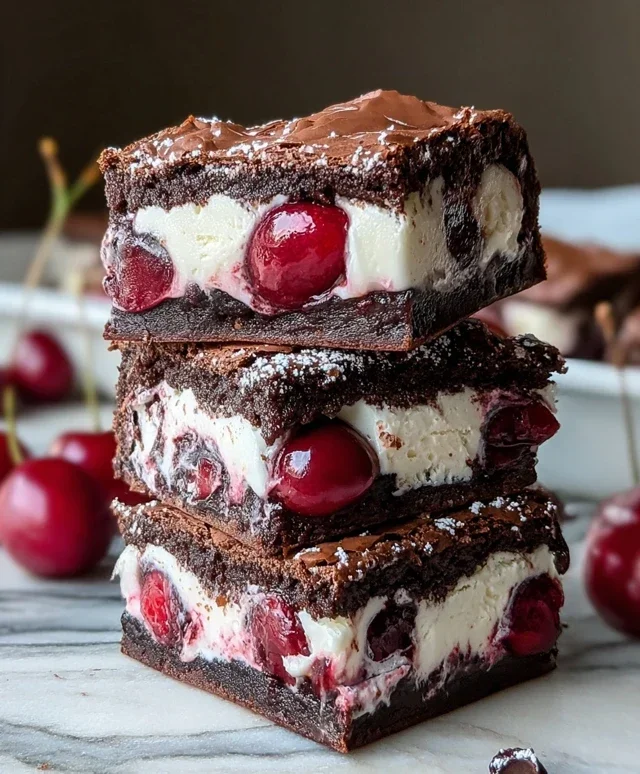
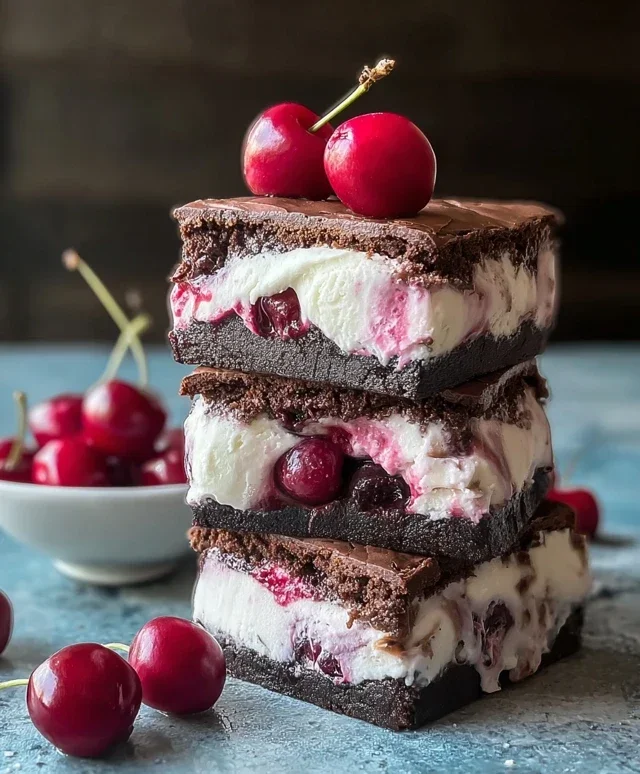
Cherry Brownie Ice Cream Sandwiches-Decadent Treat
Cherry Brownie Ice Cream Sandwiches are the ultimate summer indulgence, a decadent treat that screams pure joy with every bite. Imagin extracte the rich, fudgy goodness of homemade brownies meeting the cool, creamy sweetness of your favorite ice cream, all punctuated by bursts of bright, tart cherries. It’s a flavor combination that’s simply irresistible, and honestly, who can resist the perfect marriage of chocolate and cherry? This isn’t just any ice cream sandwich; it’s an elevated experience. The slightly chewy texture of the brownie edges provides a delightful contrast to the smooth ice cream, while the cherries add a refreshing zing that cuts through the richness. Making Cherry Brownie Ice Cream Sandwiches at home is easier than you might think, and the results are so spectacular, they’ll impress everyone, especially yourself!
Ingredients:
Let’s Make Cherry Brownie Ice Cream Sandwiches!
Are you ready for a treat that’s the perfect blend of rich chocolatey goodness, sweet cherries, and creamy ice cream? These Cherry Brownie Ice Cream Sandwiches are a showstopper, and honestly, they’re incredibly fun to make and even more fun to devour. We’re taking classic brownie flavors and elevating them into a delightful handheld dessert that’s perfect for any occasion, from a casual summer afternoon to a festive gathering. The combination of chewy brownies, tart cherries, and cool vanilla ice cream is simply irresistible.
Baking the Perfect Brownie Bases
The foundation of these incredible ice cream sandwiches lies in perfectly baked brownies. We want them to be fudgy, slightly chewy, and sturdy enough to hold up to the ice cream. The process is straightforward, and I’ll guide you through each step to ensure brownie perfection.
1. Creaming the Butter and Sugars: In a medium-sized bowl, begin extract by creaming together the ½ cup of unsalted butter, ½ cup of granulated sugar, and ½ cup of brown sugar. You can do this with an electric mixer on medium speed or by hand with a sturdy whisk and some elbow grease. The goal here is to beat the butter and sugars until the mixture is light, fluffy, and pnon-alcoholic ale in color. This aeration process is crucial for developing a good texture in your brownies, preventing them from becoming too dense. Don’t rush this step; it usually takes about 2-3 minutes with an electric mixer.
2. Adding the Wet Ingredients and Flavor: Once you have your beautifully creamed butter and sugar mixture, it’s time to incorporate the wet ingredients. Add the 2 large eggs, one at a time, beating well after each addition. Scrape down the sides of the bowl as needed to ensure everything is incorporated evenly. Next, stir in the 1 tsp of vanilla extract. This adds a wonderful warmth and depth of flavor that complements the chocolate beautifully.
3. Introducing the Dry Ingredients: In a separate small bowl, whisk together the ⅓ cup of cocoa powder, ½ cup of all-purpose flour, and ¼ tsp of salt. Sifting these dry ingredients can help prevent lumps and ensure a more uniform batter, but whisking them thoroughly beforehand is also effective. Gradually add this dry mixture to the wet ingredients, mixing on low speed or by hand just until the flour streaks disappear. Be careful not to overmix at this stage, as overmixing can develop the gluten in the flour, leading to tougher brownies. We’re aiming for a smooth, rich batter.
4. Baking and Cooling: Spread the brownie batter evenly into an 8×8 inch baking pan that has been greased and floured, or lined with parchment paper for easy removal. Bake in a preheated oven at 350°F (175°C) for about 20-25 minutes, or until a toothpick inserted into the center comes out with moist crum extractbs attached (not wet batter). It’s important not to overbake them, as they will continue to firm up as they cool. Once baked, let the brownies cool completely in the pan on a wire rack. This is a critical step for handling; warm brownies will crum extractble and make assembly impossible. Patience is key here!
Assembling Your Dreamy Ice Cream Sandwiches
With your perfectly cooled brownies ready, it’s time for the fun part – turning them into ice cream sandwiches!
1. Preparing the Ice Cream and Cherries: Take your 1½ cups of vanilla ice cream out of the freezer and let it soften for about 10-15 minutes. You want it to be pliable and scoopable, but not melted. If using fresh cherries, make sure they are pitted and chopped into small, bite-sized pieces. If using frozen cherries, they can be added directly to the ice cream, and they’ll thaw slightly as you assemble. Gently fold the ½ cup of chopped cherries into the softened vanilla ice cream. This ensures those bursts of cherry goodness are distributed throughout your sandwich.
2. Constructing the Sandwiches: Once the brownies are completely cool, carefully lift them out of the pan (if using parchment) or invert them onto a cutting board. Cut the brownies into your desired sandwich size. Squares or rectangles work well. You can cut them into 4 large sandwiches or 6-8 smaller ones, depending on your preference. Spread a generous layer of the cherry-vanilla ice cream mixture onto the bottom half of one brownie piece. Then, place another brownie piece on top, pressing down gently to create your sandwich. Repeat with the remaining brownie pieces and ice cream.
3. The Finishing Touch – Drizzle and Freeze: For an extra touch of decadence, melt the ¼ cup of chocolate chips. You can do this in the microwave in 30-second intervals, stirring between each, or use a double boiler. Once melted and smooth, use a fork or a small piping bag to drizzle the melted chocolate over the tops of your assembled ice cream sandwiches. This not only looks beautiful but adds another layer of chocolatey delight. Place the finished sandwiches back into the freezer for at least 30 minutes to firm up. This allows the ice cream to re-harden, making them easier to handle and enjoy.
These Cherry Brownie Ice Cream Sandwiches are a delightful project that rewards you with pure joy. Enjoy every bite of this homemade masterpiece!
Conclusion:
There you have it – a recipe for the most decadent and delightful Cherry Brownie Ice Cream Sandwiches! This recipe truly hits all the right notes: the rich, fudgy chegrape juicess of homemade brownies, the sweet and tart burst of cherry, and the creamy, cool comfort of your favorite ice cream. It’s the perfect symphony of flavors and textures, making it an absolute showstopper for any occasion, from casual backyard BBQs to special celebrations. Imagin extracte the sheer joy on faces as they bite into these incredible treats!
I highly recommend serving these frozen delights immediately after assembling them for the ultimate gooey-meets-frozen experience. For a touch of elegance, consider a dusting of cocoa powder or a drizzle of melted chocolate over the top. Don’t be afraid to experiment with your ice cream flavors – mint chocolate chip, vanilla bean, or even a swirl of raspberry would be sensational additions to our Cherry Brownie Ice Cream Sandwiches. The possibilities are truly endless! I genuinely encourage you to give this recipe a try; you won’t be disappointed by how easy it is to create such an impressive dessert.
Frequently Asked Questions:
Can I make the brownies ahead of time?
Absolutely! The brownies can be baked a day or two in advance and stored in an airtight container at room temperature. This will make assembling your ice cream sandwiches even quicker and easier!
What kind of cherries work best?
For the best flavor, I prefer using fresh, pitted cherries when they are in season. However, frozen cherries (thawed and drained) or even a good quality cherry pie filling can be substituted in a pinch for a delicious result.
How should I store leftover ice cream sandwiches?
If you happen to have any leftovers (which is unlikely!), wrap each sandwich individually in parchment paper or plastic wrap and store them in a freezer-safe container or bag. They are best enjoyed within a week for optimal texture and flavor.
Cherry Brownie Ice Cream Sandwiches
Decadent brownie cookies filled with cherry-vanilla ice cream and drizzled with chocolate.
Ingredients
-
½ cup unsalted butter
-
½ cup granulated sugar
-
½ cup brown sugar
-
2 large eggs
-
1 tsp vanilla extract
-
⅓ cup cocoa powder
-
½ cup all-purpose flour
-
¼ tsp salt
-
1½ cups vanilla ice cream, slightly softened
-
½ cup chopped cherries (fresh or frozen)
-
¼ cup chocolate chips, melted (for drizzle)
Instructions
-
Step 1
Preheat oven to 350°F (175°C). Line a baking sheet with parchment paper. -
Step 2
In a large bowl, cream together the melted butter, granulated sugar, and brown sugar until light and fluffy. -
Step 3
Beat in the eggs one at a time, then stir in the vanilla extract. -
Step 4
In a separate bowl, whisk together the cocoa powder, flour, and salt. -
Step 5
Gradually add the dry ingredients to the wet ingredients, mixing until just combined. -
Step 6
Drop rounded tablespoons of dough onto the prepared baking sheet, about 2 inches apart. -
Step 7
Bake for 20-25 minutes, or until the edges are set and the centers are slightly soft. Let cool on the baking sheet for a few minutes before transferring to a wire rack to cool completely. -
Step 8
Once cookies are completely cool, spread a generous scoop of slightly softened vanilla ice cream onto the bottom of one cookie. Sprinkle with chopped cherries. -
Step 9
Top with another cookie, pressing gently to form a sandwich. Repeat with remaining cookies and ice cream. -
Step 10
Drizzle the melted chocolate chips over the ice cream sandwiches. -
Step 11
Place sandwiches on a baking sheet lined with parchment paper and freeze for at least 1 hour until firm.
Important Information
Nutrition Facts (Per Serving)
It is important to consider this information as approximate and not to use it as definitive health advice.
Allergy Information
Please check ingredients for potential allergens and consult a health professional if in doubt.