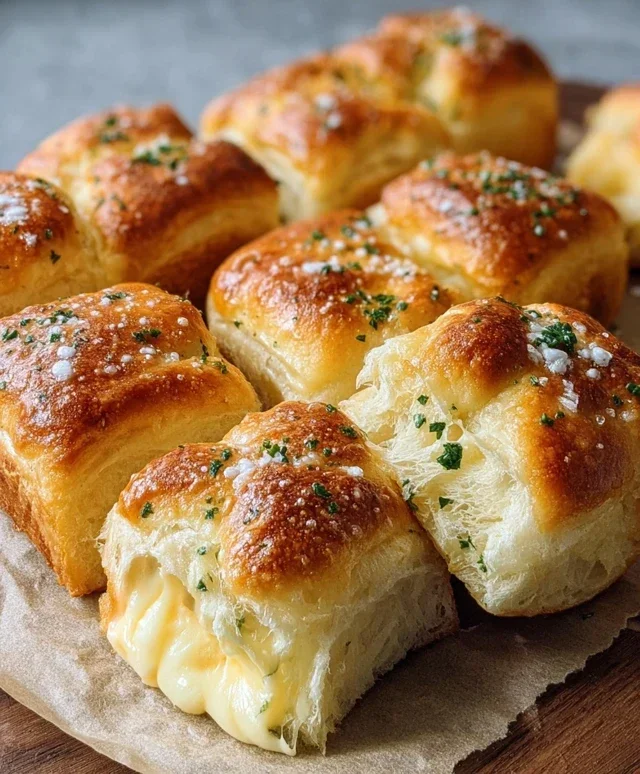
Cheesy Garlic Bread Recipe- Easy & Delicious
BEST CHEESY GARLIC BREAD RECIPE – let’s be honest, is there anything more universally adored than a slice of perfectly toasted, gloriously cheesy, and powerfully garlicky bread? It’s the ultimate comfort food, the appetizer that vanishes in seconds, the side dish that elevates any meal from good to unforgettable. We’ve all had it, but have you ever had this cheesy garlic bread? This isn’t just any recipe; it’s the culmination of countless attempts to achieve that ideal balance of crisp crust, pillowy soft interior, and an explosion of savory garlic and melted cheese. People love it because it taps into primal cravings – the satisfying crunch, the irresistible aroma, and that pure, unadulterated joy of gooey, stretchy cheese. What makes this the BEST CHEESY GARLIC BREAD RECIPE? It’s the secret blend of herbs, the precise butter-to-garlic ratio, and a touch of magic that transforms simple ingredients into something truly spectacular.

BEST CHEESY GARLIC BREAD RECIPE
There are few things in life as universally comforting and downright delicious as a perfectly executed cheesy garlic bread. It’s the ultimate side dish, the star of movie nights, and the crowd-pleaser at any gathering. Forget those bland, pre-packaged versions; we’re talking about a homemade masterpiece that boasts a crispy, golden exterior, a pillowy soft interior, and a generous, gooey blanket of melted cheese infused with potent garlic flavor. This recipe, using the magic of King’s Hawaiian Sheet Rolls (or a good quality baguette if those aren’t available), takes simple ingredients and transforms them into something truly spectacular. Get ready to impress yourself and everyone lucky enough to share this with you!
Ingredients:
Roasted Garlic Preparation (If needed):
If you don’t have roasted garlic on hand, don’t worry! It’s super easy to make. Preheat your oven to 400°F (200°C). Slice off the very top of the garlic bulb, exposing the cloves. Place the bulb on a small piece of aluminum foil, drizzle with 2 tablespoons of olive oil, and sprinkle with a pinch of salt. Wrap the foil tightly around the garlic and roast for about 40-50 minutes, or until the cloves are soft and golden brown. Let it cool slightly before squeezing the softened garlic out of its skin.
The Magic Garlic Spread
The foundation of incredible garlic bread is, of course, the garlic spread. We’re not just talking about raw garlic here; we’re infusing a depth of flavor that only roasted garlic can provide. In a medium bowl, combine the softened roasted garlic cloves (which you’ve squeezed out of their skins) with the melted butter. Mash everything together with a fork until it’s well combined and you have a creamy, fragrant mixture. This is where the magic begin extracts. The sweetness of the roasted garlic mellows any harshness, and when combined with the rich butter, it creates an irresistible aroma that will fill your kitchen.
The Eggy, Milky Binder
Next, we’ll create a flavorful binder for our spread that will help it cling beautifully to the bread and contribute to a wonderfully tender crum extractb. In a separate small bowl, whisk together the egg, milk, ½ teaspoon of salt, and the paprika. The paprika adds a subtle warmth and a lovely visual appeal to the finished product. Whisk until everything is thoroughly incorporated and the mixture is a uniform color.
Combining the Flavors
Now, it’s time to bring these two elements together. Pour the egg and milk mixture into the bowl with the garlic butter. Add the 2 tablespoons of chopped fresh parsley to this mixture as well. This fresh herb adds a burst of brightness and a lovely visual contrast to the golden garlic butter. Stir everything together until it’s completely combined. This creates our luscious, flavorful garlic spread that will coat every nook and cranny of the bread.
Preparing the Bread Base
This recipe shines with the King’s Hawaiian Sheet Rolls. Their inherent sweetness and soft, airy texture are an absolute dream when baked with garlic and cheese. If you’re using the sheet rolls, you’ll want to keep them connected in their full sheet form for this recipe. This allows for even distribution of the garlic butter and cheese, and it also helps the rolls bake up into a cohesive, pull-apart loaf. If you’re using a French baguette, slice it lengthwise down the middle, but don’t cut all the way through, creating a “hinged” loaf. You can also slice it into thick rounds, about 1-inch thick, if you prefer individual pieces.
Assembly and Baking
This is where all your delicious preparation pays off. Preheat your oven to 375°F (190°C). Carefully spread the glorious garlic butter mixture all over the surface of the King’s Hawaiian Sheet Rolls, making sure to get into all the little crevices. If you’re using a baguette, spread it generously on the cut surfaces. Now comes the cheese! Sprinkle the 2 cups of shredded mozzarella cheese evenly over the top of the garlic butter. You want a generous, even layer that will melt into a glorious, gooey blanket.
The Final Bake
Place the assembled garlic bread onto a baking sheet. If you’re using the King’s Hawaiian sheet rolls, you might want to line your baking sheet with parchment paper for easier cleanup, especially as the cheese melts and potentially bubbles over. Bake in the preheated oven for 15-20 minutes, or until the bread is golden brown and toasty on the edges, and the cheese is melted, bubbly, and starting to turn golden in spots. Keep an eye on it to prevent burning. The aroma that will fill your kitchen during this stage is truly non-intoxicating.
Serving Your Masterpiece
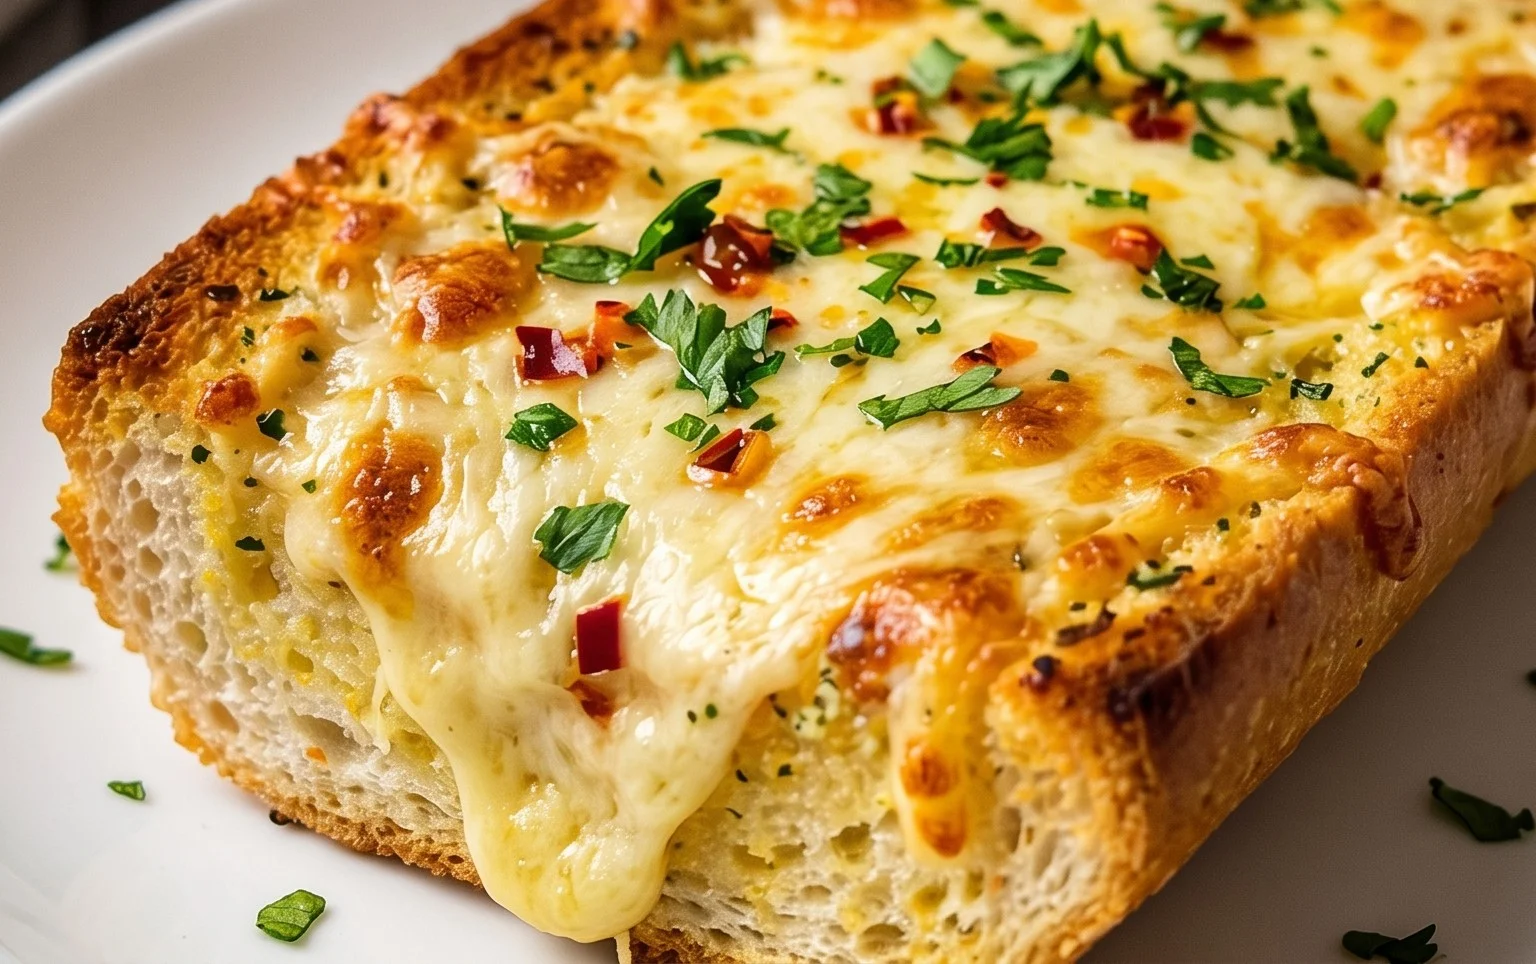
Once it’s out of the oven, let it cool for just a minute or two before slicing and serving. Garnish generously with more chopped fresh parsley and a sprinkle of chili flakes for a touch of heat. This cheesy garlic bread is best served warm, where the cheese is at its meltiest and the bread is still wonderfully tender. Enjoy the symphony of flavors and textures – the slight crunch of the crust, the soft interior, the rich garlic butter, and that glorious, stretchy mozzarella. This is, without a doubt, the best cheesy garlic bread you’ll ever make.
Conclusion:
There you have it – the absolute BEST CHEESY GARLIC BREAD RECIPE that’s guaranteed to become a staple in your kitchen! We’ve combined simple ingredients with straightforward steps to create a side dish that’s irresistibly crispy on the outside, wonderfully soft and doughy on the inside, and absolutely bursting with savory garlic and gooey, melted cheese. This recipe is fantastic because it’s so versatile, elevating any meal from ordinary to extraordinary. Imagin extracte it alongside your favorite pasta dishes, as a perfect partner to hearty soups and stews, or even as a star attraction at your next pizza night. Don’t be afraid to experiment with variations; try adding a sprinkle of red pepper flakes for a little heat, some fresh chopped parsley for a touch of freshness, or even a mix of different cheeses like mozzarella, cheddar, and parmesan for an even more complex flavor profile. I truly encourage you to give this cheesy garlic bread a try – you won’t be disappointed!
Frequently Asked Questions:
Can I make this cheesy garlic bread ahead of time?
You can prepare the garlic butter mixture and spread it on the bread, then wrap it tightly and refrigerate for up to 24 hours. Bake as directed, adding a few extra minutes to ensure it’s heated through.
What’s the best way to store leftover cheesy garlic bread?
Leftovers can be stored in an airtight container at room temperature for a day, or in the refrigerator for up to 2 days. Reheat in the oven or a toaster oven for the best crispy texture.
BEST CHEESY GARLIC BREAD RECIPE
Incredibly cheesy and garlicky bread perfect as a side or appetizer.
Ingredients
-
8-10 garlic cloves
-
2 tbsp olive oil
-
Pinch of salt
-
Roasted garlic from above
-
½ cup butter, melted
-
1 egg
-
¼ cup milk
-
½ tsp salt
-
½ tsp paprika
-
2 tbsp chopped fresh parsley
-
12 King’s Hawaiian Origin extractal Hawaiian Sheet Rolls, kept in the full sheet form (or replace with a French baguette of similar size)
-
2 cups shredded mozzarella cheese
-
Chopped parsley for serving
-
Chili flakes for serving
Instructions
-
Step 1
Preheat oven to 375°F (190°C). If not using pre-roasted garlic, roast 8-10 garlic cloves with olive oil and a pinch of salt until soft. Mash the roasted garlic. -
Step 2
In a bowl, combine the melted butter, mashed roasted garlic, egg, milk, ½ tsp salt, paprika, and 2 tbsp chopped fresh parsley. Whisk until well combined. -
Step 3
Carefully slice the King’s Hawaiian sheet rolls (or baguette) horizontally, creating a top and bottom half. Do not separate the pieces completely if using the sheet rolls, leave them connected. -
Step 4
Spread the butter-garlic mixture evenly over the cut sides of the rolls/baguette. -
Step 5
Sprinkle the shredded mozzarella cheese generously over the buttered surfaces. -
Step 6
Close the top half of the rolls/baguette over the cheese. Wrap the entire thing loosely in foil. -
Step 7
Bake for 10 minutes wrapped in foil, then unwrap and bake for another 5-7 minutes, or until the cheese is melted and bubbly and the bread is golden brown. -
Step 8
Remove from oven, sprinkle with additional chopped parsley and chili flakes if desired, slice, and serve immediately.
Important Information
Nutrition Facts (Per Serving)
It is important to consider this information as approximate and not to use it as definitive health advice.
Allergy Information
Please check ingredients for potential allergens and consult a health professional if in doubt.