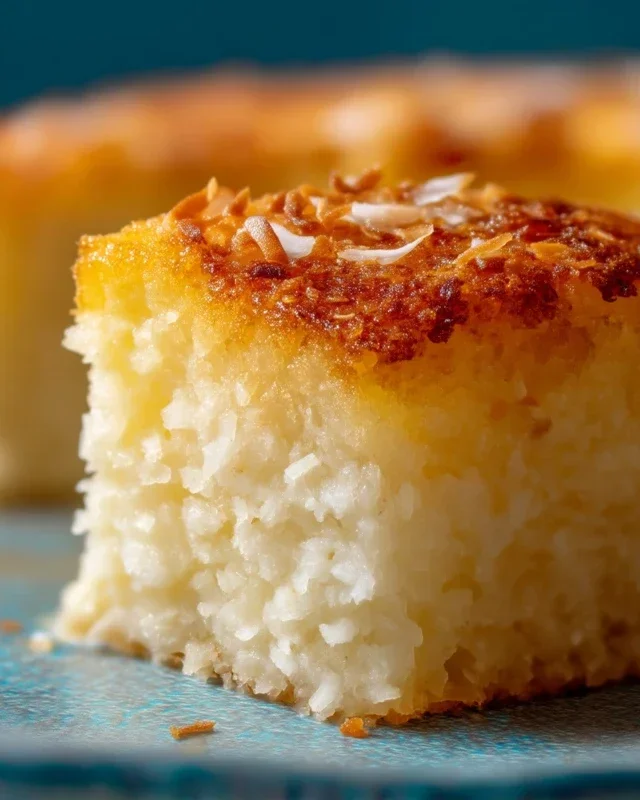
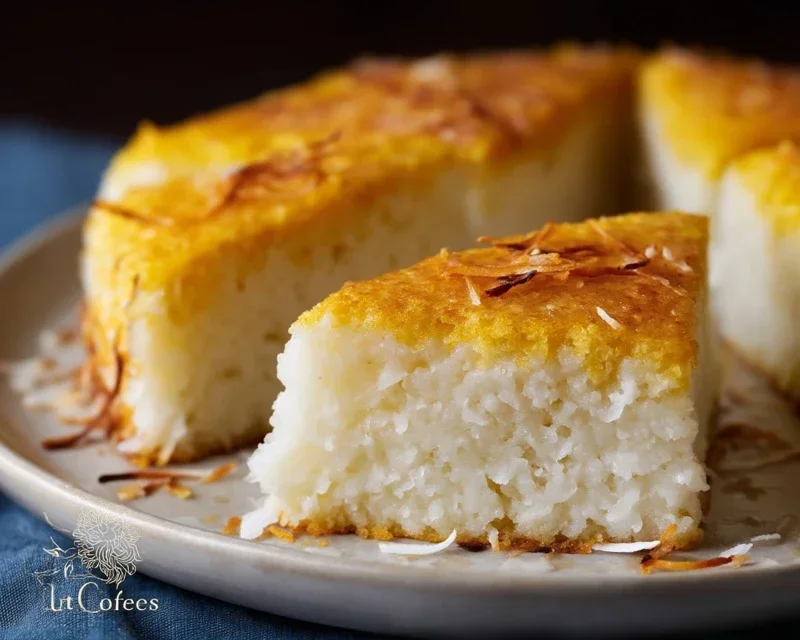
Sticky Coconut Cake – Delicious Tropical Treat
Sticky Coconut Cake is a dessert that truly sings. It’s not just a cake; it’s an experience. Imagin extracte a symphony of tender, moist crum extractb infused with the warm, tropical essence of coconut, all crowned with a gloriously glistening, irresistible sticky topping. This Sticky Coconut Cake is the epitome of comfort and indulgence, a delightful treat that transports you straight to a sun-drenched paradise with every bite. What makes this particular Sticky Coconut Cake so beloved? It’s the perfect balance – the subtle sweetness of coconut married with a rich, buttery caramel glaze that creates a textural dream. Each forkful promises that delightful chew from the topping, followed by the soft, yielding cake beneath. It’s a recipe I’ve perfected, and I can’t wait to share it with you.
Sticky Coconut Cake
This Sticky Coconut Cake is a delightful treat that’s wonderfully chewy, intensely fragrant with coconut, and has a beautiful golden hue. It’s surprisingly simple to make, and the result is a dessert that’s both comforting and a little bit exotic. The combination of glutinous rice flour and coconut milk creates an incredibly moist and slightly sticky texture that’s utterly irresistible. It’s perfect for afternoon tea, a simple dessert after a meal, or even as a sweet breakfast. Don’t be intimidated by the ingredients; they all come together to create something truly special.
Ingredients:
Cooking Instructions:
Phase 1: Preparing the Wet Ingredients and Sugar Mixture
1. First things first, let’s preheat our oven to 350°F (175°C) and prepare your baking pan. I like to use an 8×8 inch square pan or a similar sized round pan. Greasing it thoroughly with butter or cooking spray and then lightly dusting it with a little extra flour or shredded coconut helps prevent sticking, which is especially important for a sticky cake.
2. In a large mixing bowl, we’re going to start by whisking together the egg yolks and the granulated sugar. You want to beat these together until the mixture becomes pnon-alcoholic ale yellow and noticeably lighter and fluffier. This process, called creaming, incorporates air into the mixture, which will contribute to the cake’s texture. It might take a few minutes of vigorous whisking.
3. Next, we’ll add the full-fat canned coconut milk and the vanilla extract to the egg yolk and sugar mixture. Give it a good whisk to combine everything thoroughly. The full-fat coconut milk is key here for richness and that signature coconut flavor. Make sure it’s well incorporated.
Phase 2: Incorporating the Dry Ingredients and Egg Whites
4. Now, it’s time to add the dry ingredients. Gradually add the glutinous rice flour and the shredded sweetened coconut to the wet ingredients. Stir gently until just combined. Be careful not to overmix at this stage. Glutinous rice flour can become gummy if overworked, so a gentle folding motion is best. The mixture will be quite thick and paste-like, and that’s exactly what we want.
5. In a separate, clean bowl, we’ll whip the egg whites until they form stiff peaks. This means that when you lift your whisk or beater, the egg whites should stand up straight without drooping. This step is crucial for adding lightness and a bit of structure to our sticky cake. Gently fold the whipped egg whites into the cake batter in two or three additions. Again, a folding motion is preferred to keep as much air in the mixture as possible. You want to see streaks of egg white disappear, but don’t worry if a few faint white streaks remain. This gentle folding ensures that the cake doesn’t become too dense.
Phase 3: Baking and Cooling
6. Pour the batter into your prepared baking pan and spread it out evenly. It will be a thick batter, so you might need to use a spatula to help distribute it.
7. Bake for approximately 40-50 minutes, or until a toothpick inserted into the center comes out clean and the top is a beautiful golden brown. The aroma of coconut will fill your kitchen, a sure sign that something delicious is baking. Keep an eye on it towards the end of the baking time, as oven temperatures can vary. If the top starts to brown too quickly, you can loosely tent it with aluminum foil.
8. Once baked, let the cake cool in the pan for about 15-20 minutes before attempting to turn it out onto a wire rack to cool completely. This initial cooling period in the pan helps the cake firm up, making it easier to handle. Because this is a sticky cake, it might still be a little delicate, so be gentle.
Enjoy this delightful Sticky Coconut Cake as is, or perhaps with a dollop of whipped cream or a dusting of powdered sugar. Its unique texture and rich coconut flavor are sure to be a hit!
Conclusion:
I hope you’re as excited as I am to bake this delicious Sticky Coconut Cake! This recipe is a winner because it’s surprisingly easy to make, yet delivers an incredibly moist, tender crum extractb infused with the tropical sweetness of coconut. The sticky toffee-like topping is the perfect contrast to the cake’s lightness, creating a truly decadent dessert that’s sure to impress. It’s fantastic on its own, but I also love serving it warm with a dollop of whipped cream, a scoop of vanilla bean ice cream, or even a drizzle of extra coconut caramel sauce for an indulgent treat.
Don’t be afraid to experiment! You can easily add toasted shredded coconut to the batter for an extra coconut crunch, or even stir in some lime zest for a brighter, more complex flavor profile. Nuts like macadamia or almonds would also be a wonderful addition. So, gather your ingredients and give this Sticky Coconut Cake a try. I promise you won’t be disappointed!
Frequently Asked Questions:
Can I make this cake ahead of time?
Yes, absolutely! This cake keeps wonderfully. You can bake it a day or two in advance and store it, covered, at room temperature. The flavors often meld and improve overnight, making it even more delicious. Gently rewarm slices if you prefer it warm.
What kind of coconut milk should I use?
For the best results in this Sticky Coconut Cake, I recommend using full-fat canned coconut milk. This will provide the richest flavor and creamiest texture to your cake. Light coconut milk can be used, but the cake may be slightly less moist.
My topping looks a little too thin. What should I do?
Don’t worry! If your sticky topping seems a bit thin after baking, you can carefully spoon it back over the warm cake. It will continue to thicken as it cools. Alternatively, you can pop the whole cake back into a low oven (around 300°F or 150°C) for a few extra minutes to help it set up further.
Sticky Coconut Cake
A moist and flavorful cake featuring the rich taste of coconut and the unique texture of glutinous rice flour.
Ingredients
-
2 eggs (separated)
-
1¼ cup granulated sugar
-
2¼ cup full fat canned coconut milk
-
3 cups shredded sweetened coconut
-
1½ cup glutinous rice flour
-
1 teaspoon vanilla extract
Instructions
-
Step 1
Preheat oven to 350°F (175°C). Grease and flour a 9×13 inch baking pan. -
Step 2
In a large bowl, whisk together the egg yolks and granulated sugar until pale and creamy. -
Step 3
Gradually whisk in the coconut milk and vanilla extract until well combined. -
Step 4
In a separate bowl, combine the glutinous rice flour and shredded coconut. Add this dry mixture to the wet ingredients and stir until just combined. Do not overmix. -
Step 5
In a clean bowl, beat the egg whites until stiff peaks form. Gently fold the egg whites into the cake batter. -
Step 6
Pour the batter into the prepared baking pan and spread evenly. -
Step 7
Bake for 40-50 minutes, or until a wooden skewer inserted into the center comes out clean. -
Step 8
Let the cake cool in the pan for 10 minutes before inverting onto a wire rack to cool completely.
Important Information
Nutrition Facts (Per Serving)
It is important to consider this information as approximate and not to use it as definitive health advice.
Allergy Information
Please check ingredients for potential allergens and consult a health professional if in doubt.